|
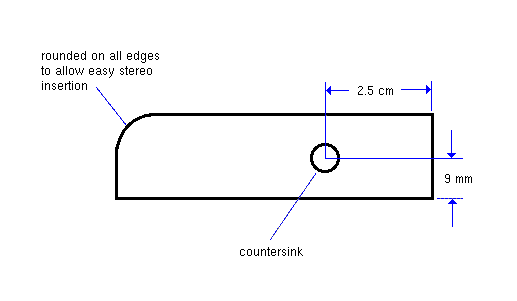
| Bracket Attached to Head Unit |
This bracket bolts to the side of the head unit, and has a matching bracket on the other side. It uses two of several holes tapped into the side of the head unit; I believe most head units have holes in the same place because of an industry standard, so you should be able to use the same brackets on most head units. I believe the holes accept a 8mm machine screw, but I'm not sure. You'll have to get a few and test them to find out what fits. You need to countersink the holes on the brackets and use countersink screws so that the screws don't interfere with the sliding action against the mating bracket.
 |
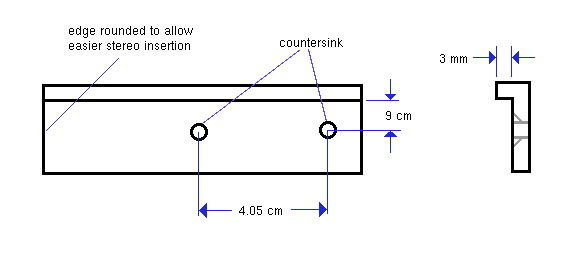
| Bracket Attached to Car |
This bracket bolts to the metal assembly inside the center console using a single large machine screw with a washer, lockwasher, and nut on the other side. The screw is countersunk into the bracket to allow the two brackets to slide along one another. I believe the screw is 1/4", but I'm not sure. Several shims (thin rectangular pieces of aluminum with a hole drilled in the middle) are placed between this bracket and the metal assembly so that the head unit fits snugly between the brackets. You'll have to experiment to find the proper number of shims. If it's snug enough, you can probably ignore the rear bracket if you wish.
 |
| Rear Bracket |
This bracket is optional and probably won't fit other head units. I took advantage of a small (4 mm) hole in my head unit's rear heatsink; you can probably find a similar hole in the rear of yours but it may not be in the same place. The large 1/4" hole in this bracket is tapped so that a machine screw can screw directly into it with no nut. This bracket bolts to a slot in the car's metal bracket in the rear of the dashboard, at the same location where the original Acura head unit bolted in.