This page details installation of component tweeters in the door panels of a 3rd generation Acura
Integra. It is assumed that tweeters are not already installed, as is the case for the early RS and
LS models. GS-R models, as well as most newer RS, LS, and GS models, have factory tweeters
installed, so replacing them with a different model if so desired should be quite simple, provided
the new tweeters are not too small for the factory openings. It is highly recommended that you
purchase a factory service manual for your vehicle before attempting this type of work. Manuals are
available from Helm Inc..
- Remove the door panels from the car doors. Disconnect power window harness connector.
- Remove 6.5" speaker assembly from door and disconnect wiring harness.
- Route speaker wire along power window wiring harness: start at connector, and continue through
vapor barrier along main door wiring harness until you reach speaker connector. Splice the new
speaker wire to the existing speaker wires so that the tweeter will be connected in parallel with
the main speaker. Fasten the new speaker wire to the existing wiring harness using electrical tape
near the connector, and using zip-ties inside the door.
Tip: use electrical tape for securing the new speaker wire to the existing
harness wherever it will be in contact with the backside of the door panel. This prevents noises
caused by vibration of hard plastic zip-ties against the hard plastic door panels.
- Cut off other end of tweeter wire, leaving plenty of length to stretch to the tweeter when the
door panel is removed. Attach a two-pin connector. I used AMP Mate-N-Lock II
connectors, part numbers 350777-1 and 350778-1.
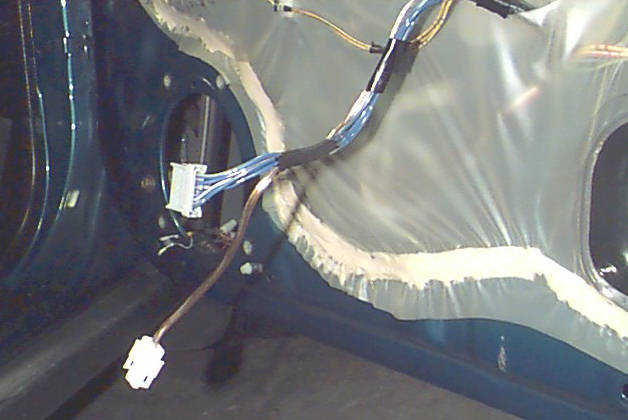 |
| Wiring harness with tweeter wire and connector |
- Locate the stock tweeter mounting location marked on the backside of the door panel. Because
the GS-R comes standard with tweeters, the drilling locations are already marked on the door panels
by a circular area bordered by an indentation. On the RS and LS models, these holes were simply not
cut out.
- Cut out a hole in this location using the diameter recommended by the tweeter manufacturer.
The Polk Audio EX1500 tweeters I used happened to have approximately the same
diameter as the marking on the door panel, making it easy to make sure my hole cut-out was
correctly centered. Use either a hole-cutting drill bit, a small jigsaw, a Dremel, or a
knife to cut the hole out.
- Install the tweeter in the hole as recommended by the manufacturer using the supplied hardware.
If the tweeter's mounting ring has a "lip" on the front like mine, it will hide any
imperfections in the cutting of the hole.
- Cut the tweeter's attached wires to an appropriate length and attach a connector that mates
correctly with the one you installed earlier. Be absolutely sure the polarity is correct.
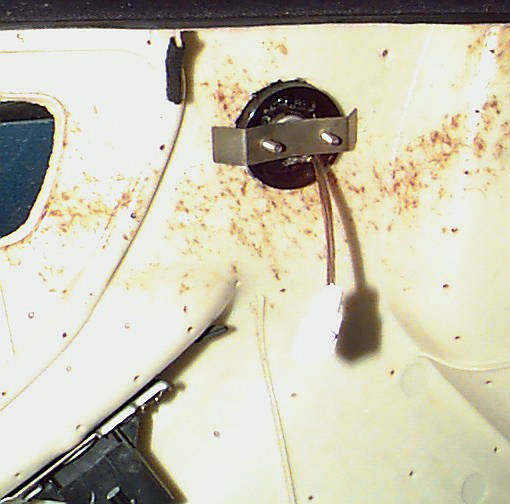 |
| Installed tweeter with connector |
- Reinstall the door panel with the new tweeter. Repeat procedure for other door. Then turn on
your stereo, insert a CD with lots of cymbal crashes, and enjoy your car's improved staging and
treble response.
 |
| Completed door panel |