Larger swaybars are one of the most potent ways of improving a car's handling. From the factory, most cars have relatively small swaybars, which allow for a smoother ride over rough roads, but also allow a lot of body roll. Swaybars work by transferring force from one side of the car during cornering, through a rod that twists torsionally, to the other side of the car, keeping the car flatter through turns. Larger-diameter bars resist this twisting more, transferring more force to the other side of the car. Integras and most other front-wheel-drive cars come from the factory set up to tend towards understeer in the interest of safety, but most performance drivers would prefer a more neutral handling vehicle. For us, this means that while a slightly larger front swaybar may be desirable, a much larger rear swaybar is needed to reduce or eliminate that understeer.
The stock sway bars on the 94-99 Integra LS are even smaller than those on the GS-R, so larger aftermarket bars have an even greater effect on the LS. After seeing a large amount of interest in using the Integra Type-R sway bars on other Integras, I looked at the cost involved (compared to the cost of good aftermarket bars) and decided to go this route.
The Integra Type-R uses the same 24mm front sway bar as the GS-R, but has a much larger 22mm rear bar. I installed the front bar first; you can read about it below. For the rear bar, several different methods have been devised. The simplest involves reversing the D-bracket mounts and using Prothane 22mm D-brackets and bushings. This method was detailed on the Honda Hybrid site. Message boards all over then told stories of people attempting this mod and experiencing "swaybar tear-out". Apparently, the subframe where the swaybar mounts attach is very thin, and the added stresses of the huge Type-R swaybar can easily rip through the sheetmetal there. The Type-R avoids this by reinforcing this area, but the rest of our Integras (and Civics) don't have this. Needless to say, I don't recommend this method.
The most popular methods now of installing the Type-R rear swaybar without any welding involve discarding the swaybar bushing mounting brackets and attaching the swaybar bushing brackets directly to the subframe, using some type of additional reinforcement. The theory here is that the bushing mounting brackets produce more leverage on the subframe at their mounting points as the swaybar twists, therefore more force is applied to those bolts and they're more likely to tear out. Apparently Honda noticed this too because the Type-R eliminates these brackets (which makes me wonder why they were ever used in the first place). Because the LS/GS-R don't have a flat surface where the large bushing brackets for the Type-R mount, some type of mounting plate is necessary. Currently, there are four known solutions for this.
At BretQ's Integra GS-R site, he provides diagrams and instructions about how to fabricate a spacer and backing plate. BretQ also sells these parts for about $20.
At Beaks Products, machined aluminum mounting brackets are available which mount to both the inside and outside of the Integra's subframe to provide a strong mounting surface for the swaybar bushing brackets. This kit costs $65. Kits for 6th generation Civics are also available.
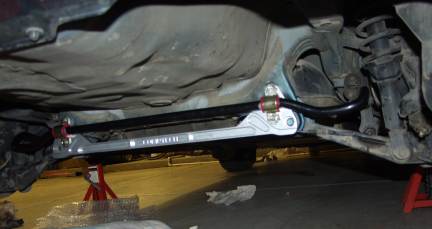
Comptech offers a sway bar/tie bar kit which elegantly solves this problem while integrating a rear tie bar. It includes Comptech's own 22mm sway bar, and a special tie bar that mounts between the suspension mounting points and also provides reinforced mounting points for the sway bar bushings. However, it's a whopping $400. But for only $175, I got them to send me only the tie bar, which I used with my $56.25 Type-R rear sway bar and $9.95 Prothane 22mm D-brackets and polyurethane bushings. You can see the results in the photo above. It even has channels for routing the ABS wires, so I don't have to keep them zip-tied any more. The Type-R swaybar doesn't have the adjustable endlinks that Comptech's bar has, but it also doesn't have its $225 price tag. It uses the same endlinks the stock sway bar used. My only complaint is that Comptech didn't send me the four 8x30mm bolts needed for installing the bar. Make sure they send these to you, because good metric bolts are really hard to find in the U.S.! (I advise buying OEM Honda bolts when this sort of thing happens.)
Update: Comptech's price for this piece is now $219, and apparently does not include any bolts. I'm also not sure if they'll even sell it separately any more.
The final option (which wasn't available when I first wrote this article) is the subframe brace from ASR (A Spec Racing). It's pretty similar to the Comptech brace, in that it acts as a subframe brace for the sway bar and as a tie bar. It's made of aluminum as well, and only costs about $190. If I were doing this project today, this is probably what I would buy.
Installing this or any rear tie bar is not an easy task. You must put the rear of the car on jackstands, remove the wheels, and the two bolts at the ends of the suspension control arms. What's worse is getting these bolts back in with the new tie bar; because of the force of the springs, the control arm becomes misaligned with respect to the holes in the chassis, making it impossible to insert the bolts. Here's how I solved this problem: First, use a jack directly under the end of the control arm, where you're inserting the bolt. This should allow you to get the bolt through the tie bar and the front of the chassis, and into the control arm. Now the control arm is twisted so it doesn't line up with the rear holes. So remove the jack, and place it under the control arm again, but under the point where the spring/shock attaches. Jack it up several inches, until you're able to (barely) push the bolt all the way through and thread it into the welded-on nut on the other side. Be careful here since that spring holds a lot of energy and can seriously hurt you if it breaks free of the jack.
The performance of this tie bar/sway bar combination is as good as everyone raves about. The car has less body roll, and very neutral handling. It's scary how fast I can go around corners now. And with Comptech's tie bar, not only do I have a very attractive installation, but I shouldn't have to worry about sway bar tear-out. I highly recommend upgrading to some stiffer springs when doing a swaybar upgrade. While the sway bar is great by itself, it's even better with stiffer springs.
One last point I'd like to address is the rubber vs. polyurethane bushing controversy. Polyurethane bushings are an excellent replacement for stock rubber bushings in most cases: they're stiffer, and they last much longer since they don't biodegrade like rubber. However, unlike rubber, they squeak a lot if they're not properly lubricated. Because of this, some people recommend using Type-R rubber swaybar bushings because they're rubber and also are stiffer than the standard bushings. I've been using polyurethane bushings for over eight years on my front swaybar, and four years on my rear bar, with no squeaking evident, so I recommend polyurethane instead, at least on these particular bushings. Just make sure to very liberally apply the supplied grease to the bushings and you should have no problems.
| Honda Part Number | |
|---|---|
| Integra Type-R Rear Sway Bar (22mm diameter) | 52300-ST7-Z01 |
| Comptech Part Number | |
| Integra Swaybar Kit (must ask for tiebar alone) | 140-105 |
| Prothane Part Number | |
| Polyurethane Sway Bar Bushings (22mm) with D brackets | 19-1121 |
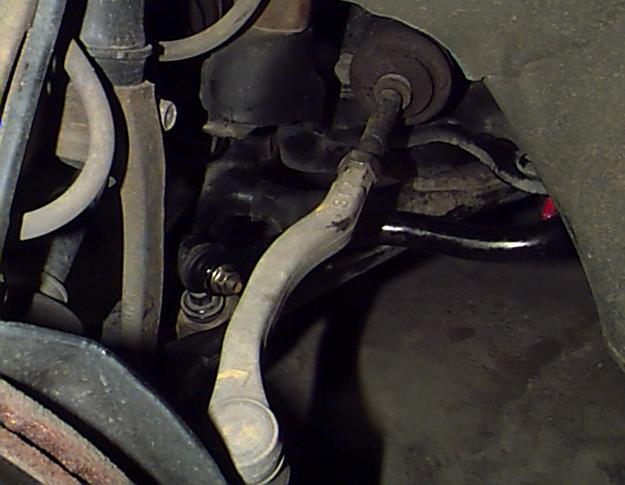
Installation of this bar was a pain due to detachment of the catalytic convertor and both shift rods. I used the original GS-R endlinks, which are superior in design to standard swaybar endlinks since they have only one set of bushings per side rather than two. I also used Prothane 24mm polyurethane bushings, which reportedly have the same effect as using a larger sway bar due to polyurethane's greater stiffness compared to rubber. Although this bar came from a GS-R, it's identical to the Type R front sway bar.
With only the front bar replaced, little performance increase was evident. However, the addition of the front bar is important if a larger rear swaybar is added, so that dangerous oversteer is not introduced by having a very large rear bar combined with the smaller 22mm LS front bar.
| Honda Part Numbers | |
|---|---|
| Integra GS-R Front Sway Bar (24mm diameter) | 51300-ST7-003 |
| Integra GS-R Front Sway Bar Endlink | 51320-ST7-003 |
| Prothane Part Number | |
| Polyurethane Sway Bar Bushings (24mm) | 8-1110 |
One important modification I had been putting off for a long time for various reasons is lowering the car using lowering springs. This provides several benefits: improving visual appearance by reducing its height to provide a sportier look, lowering the center of gravity for improved handling, and increasing the spring rate for a firmer ride and improved handling. The potential drawbacks however are many: excessive lowering can cause bottoming out on speed bumps and rough pavement, poor choice of springs can cause the back to look awkwardly lower than the front, and poor choice of spring rates can cause an excessively rough ride. In addition, lowering causes the wheels to have negative camber, necessitating expensive camber-correcting kits to avoid premature tire wear. Higher rate springs also cause the OEM shocks to wear out faster, necessitating aftermarket shocks which cost even more than the springs did. In summary, properly lowering a car can be very expensive.
To avoid excessive drop, I chose Eibach Pro-Kit springs, which drop the car an advertised 1.3" in both the front and rear. This is a relatively conservative drop, with most lowering springs lowering between 1.75" and 2.5".
So far, I've noticed an amazing improvement in handling. Steering response is much faster, and body roll is greatly reduced. The car sits noticeably lower too, and doesn't look jacked up since the wheelwell gap is reduced. However, there are some drawbacks: it's become obvious that the stock shocks need to be replaced with higher-performance units such as the adjustable Koni yellows which many people recommend, or possibly the less-expensive KYB AGX adjustable shocks. Also, there is some negative camber which I'd like to correct; for the rear, I simply installed some washers on the upper control arm mount, but in the front I'll have to purchase something more elaborate. So while these springs are a great starting point, I still need to add new shocks and camber kits to get the full handling benefit and to avoid premature tire wear.
The only complaint I have about the Pro-Kits is that they're powder-coated in a boring dark grey color, instead of a more interesting color like green or blue like many other aftermarket performance springs.