What's Included
What You Need
Headlight Wiring
Before you start hacking on your vehicle's wiring, you should probably plan out exactly how you want to install your HID Relay, and the rest of your bixenon system. The first step is to determine how your vehicle's headlights are already wired. If you can get a diagram from your vehicle's service manual, or perhaps a Haynes or Chilton book, that would be best, but if not, you can still figure it out pretty easily.
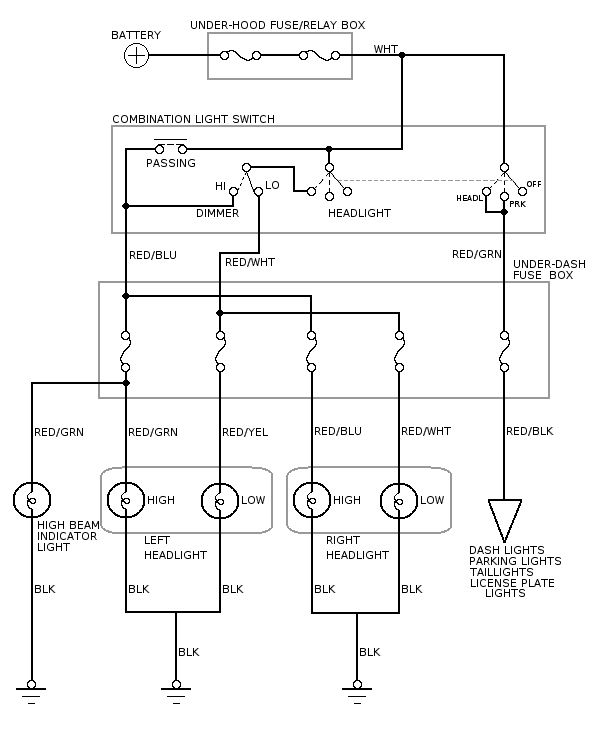
Before you even ordered your HID Relay, you should have determined if your car's headlights are positively or negatively switched, so that you could order the proper HID Relay. Below is a diagram of an example positive-switched system in stock form, from a 1994 Honda Civic.
|
|
| Stock Headlights |
As you can see in this diagram, the combination switch's dimmer function only allows current to flow to either the high-beams or the low-beams, but never both (unless the passing switch is held on). Wires from this switch go to the fuse box, and then four separate wires go to each headlight bulb (two to each side). This delivers power to the bulbs, which are then connected to ground, somewhere on the car's frame.
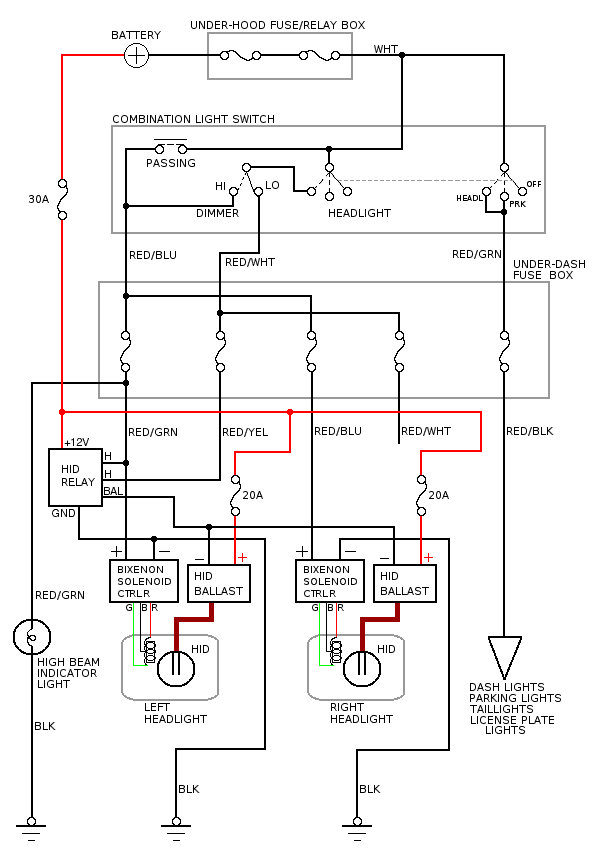
Now here is a diagram of this same system, but modified with bixenon HIDs, and using the HID Relay. This diagram shows a single HID Relay being used for both HID ballasts, but if you prefer to use two HID Relays for maximum redundancy, it should be simple to see how to hook them up.
|
| Modified Headlights |
Here, the headlight bulbs are gone, and replaced by HID bulbs and ballasts. I also illustrated this system with my bixenon solenoid controllers, but if you're not using Bosch 3-wire projectors, then this doesn't apply to you. As you can see here, the four headlight fuses in the fuse box no longer power the system. Instead, the high-beam wires are connected to the bixenon solenoids (or controllers), and the HID Relay is connected to one set of high and low beam wires.
The HID ballasts' positive terminals are connected to the battery, through three fuses. Each ballast has one 20A fuse, and the two then share a 30A fuse at the battery, which also protects the HID Relay. The secondary 20A fuses are important, because with them, if one ballast fails and blows a fuse, it's most likely to blow the 20A fuse nearest it, leaving the other ballast powered on so that you still have one working headlight. The 30A fuse protects the whole system, including the remote possibility of a defective HID Relay.
The HID Relay is designed for low-side switching, so the ground/negative terminals of the HID ballasts are connected to the "ballast" terminal of the HID Relay, which then connects and disconnects them to and from ground. Finally, the HID Relay's ground terminal is connected to a suitable ground, perhaps one which one of the headlights used.
Now that you understand how the wiring will work, you just need to decide where to mount your HID Relay, along with your other HID components if they aren't already installed. You should probably install it someplace where it won't be hard to route one set of low and high-beam wires to it. The HID Relay case has two mounting ears with holes, and can be mounted on sheet metal using self-tapping screws.
Wiring Instructions
Testing and Adjustment
Now that your system is installed, you can turn it on and try it out. Your lights should come on immediately when either your low or high beams are on. If one or both of them do not come on, try disconnecting the wire from the "B" terminal of the HID Relay, and connecting this directly to a suitable ground. If the ballasts do not come on, check the fuses and then the wiring to make sure everything is wired correctly. If the ballasts do come on, check the wiring, but the HID Relay may be malfunctioning.
If everything looks fine, try switching between high and low beams. The HID lights should remain on, without any flickering.
Lastly, turn off the lights. By default, the HID Relay is shipped with the minimum turn-off time of 1/2 second. Your lights should turn off about 1/2 second after turning off the headlight switch. If you wish to increase this time, remove the HID Relay from its mounting location, while keeping the electrical connections intact, and use a very small flat-blade screwdriver to turn the adjustment knob on the backside clockwise. Experiment with turning the lights on and off, and adjust this knob, until you reach the desired turn-off delay, then replace the HID Relay in its normal mounting location.